Processing a stream of events with Kafka and Flink
Dear reader, in this post you’ll learn how to deploy a Kafka cluster and a Flink cluster. You’ll also learn how to make a simple application in Flink to process a stream of event coming from a Kafka producer. The tutorial is intended to prepare the reader to have this first experience with both technologies and successfully deploy this simple but powerful application.
Configuration of the environment
Let’s first configure the environment. Basically we need to download and configure Kafka, Flink and eclipse
Install Kafka
https://kafka.apache.org/downloads
version: 2.12
unzip the file and move it to an applications folder in your computer
modify configuration files
zookeeper.properties
dataDir=../kafka-logs/zookeper
server.properties
log.dirs=../kafka-logs/server-0
set the KAFKA_HOME environment variable
export KAFKA_HOME=/Users/david/bigdata/kafka_2.12-2.6.0
Remember to have this variable set for all the incoming terminals that you use. Alternatively you can define it in the .bashrc profile file.
Now do a quick test if you want
https://kafka.apache.org/documentation/#quickstart
But for our purpose we’ll need only this:
bin/zookeeper-server-start.sh config/zookeeper.properties
bin/kafka-server-start.sh config/server.properties
Install Flink
https://www.apache.org/dyn/closer.lua/flink/flink-1.11.2/flink-1.11.2-bin-scala_2.11.tgz
Unzip the file and move it to an applications folder in your computer
Go to the directory and start the flink cluster
./start-cluster.sh
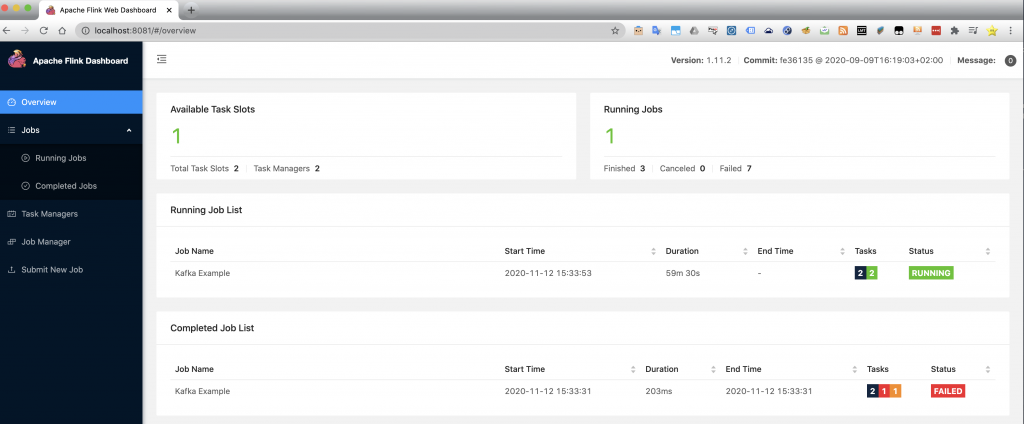
Check the Flink cluster is running:
Install Eclipse
https://www.eclipse.org/downloads/
follow the steps and set the path to an applications folder in your computer
Coding the application
Create a new project maven project in eclipse
Right click in the package explorer (located at the lateral left), create project…, Maven, Maven Project
Next, check the create a simple project checkbox and then next
Set a group id and an artifact id. This is the name of your package, then click finish
Under the project right click and then new package, give a name to the package
Under the recently create package do right click and create a new class, name the class and then click finish
Then substitute the code of the class with the following class:
package kfp1;

import java.util.Properties;

import org.apache.flink.api.java.tuple.Tuple2;
import org.apache.flink.util.Collector;
import org.apache.flink.api.common.functions.FlatMapFunction;

import org.apache.flink.streaming.api.datastream.DataStream;
import org.apache.flink.streaming.api.environment.StreamExecutionEnvironment;
import org.apache.flink.streaming.connectors.kafka.*;
import org.apache.flink.streaming.util.serialization.SimpleStringSchema;


public class KafkaFlinkC1
{
	public static void main(String[] args) throws Exception
    {
	final StreamExecutionEnvironment env =  StreamExecutionEnvironment.getExecutionEnvironment();

	Properties p = new Properties();
	p.setProperty("bootstrap.servers", "127.0.0.1:9092");

	DataStream<String> kafkaData = env.addSource(new FlinkKafkaConsumer011("test", new SimpleStringSchema(), p));

	kafkaData.flatMap(new FlatMapFunction<String, Tuple2<String, Integer>>()
			{
		public void flatMap(String value, Collector<Tuple2<String, Integer>> out)
		{
			String[] words = value.split(" ");
			for (String word : words)
				out.collect(new Tuple2<String, Integer>(word, 1));
		}	})

	.keyBy(0)
	.sum(1)
	.writeAsText("/Users/david/bigdata/kafka.txt");

	env.execute("Kafka Example");
    }

}
remember to change the package and class names for the ones that you have defined when creating the project, package and class
Now it’s time to indicate the dependencies by means of the pom.xml file. Use the following code:
<project xmlns="http://maven.apache.org/POM/4.0.0" xmlns:xsi="http://www.w3.org/2001/XMLSchema-instance" xsi:schemaLocation="http://maven.apache.org/POM/4.0.0 https://maven.apache.org/xsd/maven-4.0.0.xsd">
  <modelVersion>4.0.0</modelVersion>
  <groupId>kafka-flink</groupId>
  <artifactId>kafka-flink</artifactId>
  <version>0.0.1-SNAPSHOT</version>
<dependencies>

	<dependency>
 	 <groupId>org.apache.flink</groupId>
  		<artifactId>flink-java</artifactId>
  	<version>1.11.2</version>
  	<scope>provided</scope>
	</dependency>

	<dependency>
  <groupId>org.apache.flink</groupId>
  <artifactId>flink-streaming-java_2.11</artifactId>
  <version>1.11.2</version>
  <scope>provided</scope>
</dependency>

<dependency>
  <groupId>org.apache.flink</groupId>
  <artifactId>flink-clients_2.11</artifactId>
  <version>1.11.2</version>
  <scope>provided</scope>
</dependency>

<dependency>
  <groupId>org.apache.flink</groupId>
  <artifactId>flink-connector-kafka-0.11_2.11</artifactId>
  <version>1.11.2</version>
</dependency>
<dependency>
      <groupId>commons-logging</groupId>
      <artifactId>commons-logging</artifactId>
      <version>1.1.1</version>
    </dependency>

</dependencies>

<build>
	<plugins>
		<plugin>
			<groupId>org.apache.maven.plugins</groupId>
			<artifactId>maven-assembly-plugin</artifactId>
			<version>3.1.0</version>
				<configuration>
					<!-- get all project dependencies -->
					<descriptorRefs>
						<descriptorRef>jar-with-dependencies</descriptorRef>
					</descriptorRefs>
					<!-- MainClass in mainfest make a executable jar -->
					<archive>
					  <manifest>
						<mainClass>kfp1.KafkaFlinkC1</mainClass>
					  </manifest>
					</archive>

				</configuration>
				<executions>
				  <execution>
					<id>make-assembly</id>
                                        <!-- bind to the packaging phase -->
					<phase>package</phase>
					<goals>
						<goal>single</goal>
					</goals>
				  </execution>
				</executions>
			</plugin>
	</plugins>
</build>

 <properties>
    <maven.compiler.source>1.7</maven.compiler.source>
    <maven.compiler.target>1.7</maven.compiler.target>
  </properties>

</project>
Remember to check your java compiler version as well as the Flink downloaded version. Otherwise you may not encounter errors at compilation time but you’ll face out error when deploying the application in the Flink cluster. For this demo the Flink version has been 1.11.2.
Go tot the pom.xm file. Do right click and select maven clean, then do a maven install. First time, the required jars will be downloaded so this can take some minutes. Inside eclipse in the below terminal check the jar path and keep it open because we will use that path to indicate to Flink run where the .jar is located.
Testing the system
bin/kafka-console-producer.sh --broker-list localhost:9092 --topic test
./bin/flink run /Users/david/eclipse-workspace/kafka-flink/target/kafka-flink-0.0.1-SNAPSHOT-jar-with-dependencies.jar
Now we can check that our package is running in the Flink cluster by going to the Flink dashboard
Now get back to the kafka producer terminal and start sending your values. Those values will be the keys that Flink will receive, process doing the aggregation and then write in a file sink.
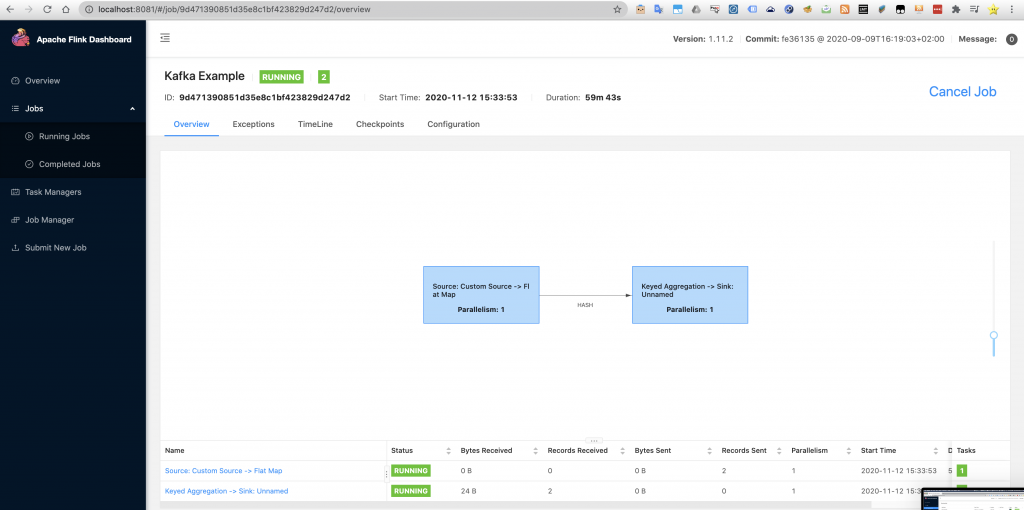
If we want to see how the code is doing under the hood when running on top of the Flink cluster we can check it by doing click in the Flink job.
Notice how the application get structured in two tasks. The first task is in charge of receiving the events that the Kafka producer sends and does the flat map, whereas the second task is in charge of performing the aggregations of each key and then sending them to the sink, which in this case it consists of writing in an output file in the designated path.
Now check the the output file and voilà you’ll see how each key gets increased by 1 each time you type it in the Kafka producer.
Conclusions
Taking into account that Kafka and Flink are not easy technologies to learn and to deploy this tutorial is a demonstration of how to set a local environment in an easy and fast way. Having said that, now it is much more easier to learn Flink and to test our ideas locally without the need of running anything in a cluster, Kubernetes or even using MSK and EMR in AWS which would cost us some money just for the sake of learning.
Comparing Flink with Spark Streaming would require a whole post. However, at the time of writing this post, Flink turns out to be a bit more difficult in comparison with Spark Structured Streaming as the operations resemble more to MapReduce model so it is not as direct as to think in terms of Dataframes or Datasets.


